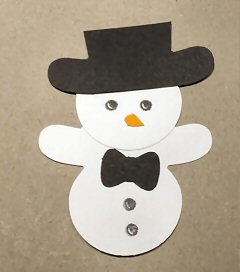
I love getting new punches from Stampin' Up! as I can challenge myself to create other characters and objects. I have had my pre-order goodies for quite a while but have just been too busy to do any crafting. My daughter has just received her exam results and is off to college next week so there has just been so much to sort out and time has just slipped by. So my first play has been using the Cookie Cutter punch. I have created a snowman by cutting out 2 white shapes and 1 black, and then an orange heart which I cut in half to create his nose. Then just a little bit of cutting and sticking and hey presto a snowman. 
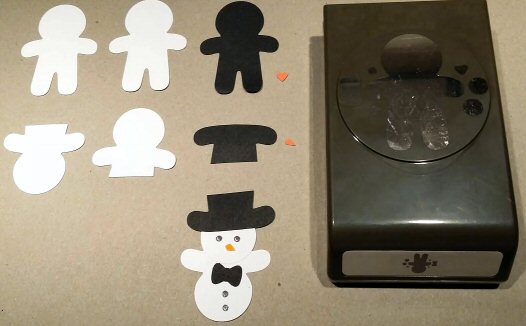
I used the stamp in the set and Tuxedo black ink to create the eyes and the buttons. I added the bow tie as an afterthought. I will have more of a play and maybe trim the hat a little and add a scarf and a candy cane and see what else i can come up with! Happy Crafting!
2 Comments
Some time ago one of my crafting ladies gave me a gift bag. It had been made from newspaper with a little card in places to make it sturdy. I had wanted to have a go myself and have finally got around to making some using old Stampin' Up! catalogues. I used the seasonal catalogues as they are easy to take apart. You just remove the staples from the centre pages (carefully of course to avoid any finger damage)! You then have a large selection of double pages which you can use to create your gift bag. To make the bag you will need to use a score board. I used the Simply Score board from Stampin' Up! Take your double page and keeping it folded in half place it on the score board. Score at 1" 7" and 8" on the short side and on the long side score at 1 1/2" and 9" I used two pieces of card to reinforce the top part of the bag measuring 6" x 1 1/2" and once assembled I also reinforced the base of the bag putting in a piece of card measuring 6" x 2" You can use any scrap card you have I had some cereal boxes which I cut to size. You can make holes at the top of the bag for ribbon using a Crop a Dile or hole punch tool. Please find instructions below.
So I can't believe I am making Christmas goodies in August but with the arrival of my Stampin' Up! pre-order from the Seasonal Catalogue I couldn't resist a play. As soon as I saw the Santa Sleigh framelits I knew I wanted to make it 3D. It's hard to find a chocolate santa in August so I just made a paper one for now! It is a simple box 4 1/4" x 2 1/4" scored at 1" intervals (on the 4 1/4" side) use the 1/4" remaining to create a tab. To create the base turn and score on the short side at 3/4" and cut up each score to the first score line. I may have to adjust once I have the chocolate santa for real. Although I may also have to try Ferrore Rocher chocolate or Hersheys possibly (I love my chocolate). I have taken a top view too so you can get a look. I made a little box as a spacer to use between the reindeers. This was just a scrap off cut scored at 1/4" intervals. The reins are secured using gold off cuts from the carriage base.
This week I have been using toilet roll inners to create a selection of mini albums from the most basic to a very detailed version. I have been collecting the rolls for some time now and ensured they were very flat. You can put them through the Big Shot to help but it's best to put them under some heavy books for a while so they are completely flat. For the most basic version I inked the edges of each roll, on both sides. Then I cut out pattern paper slightly smaller than the roll and glued in place. Finally I used my Crop O Dile to punch holes and add eyelets for binder loops. Each roll has a tag insert created using the Tag Topper Punch from Stampin' Up! For the next album I made, I created a chip board cover using the Top Note die a retired Stampin' Up! product. This was an album all about a Westie Dog in the family called Poppy. I used four toilet roll inners and this time I covered each roll completely with pattern paper. I added a 1" strip of card to reinforce the end of the roll which has the punched holes. The card I used for the cover and the tags was old packaging material from my Stampin' Up! card and paper purchases!! I wrapped pattern paper around each roll, edge to edge on the width and just added half an inch on the length to tuck under and then glued in place. Here are some examples of how each roll can be decorated to create an album page. The pattern paper can be cut so that it can be tucked neatly in to the end of each roll and glued in place to give a clean finish. Cut paper to size by measuring the roll length and adding one inch. Then take the roll width x 2 and add one inch. Full instructions can be found below. I have created a deluxe version which I will share next time.
|
Hi, my name is Pauline Barnfather and I am a Stampin Up! demonstrator in Basingstoke, UK. Welcome to my Blog!
I get excited about any style of paper crafting so enjoy having a look. I hope my projects inspire you to get crafting! Archives
April 2021
Categories
All
|